PortX JD Edwards Connector for Mule 4 - Demo - Submit a UBE
- Introduction
- Demo Project - Submit a Batch Process
- Creating a new Mule Project
- Project Dependencies
- Required files
- Other Considerations
- Troubleshooting
- Configure the Global Element
- Creating a HTTP Listener for your flow
- Submit a Batch Process / Report
- Troubleshooting
- Set Payload Output
- Testing the Mule Flow
- Handling exceptions
- Defining Data Selection
- PortX JDE Connector – Additional Demo Projects
Introduction
The PortX JDE Connector leverages the internal capabilities of Oracle’s JD Edwards EnterpriseOne™ solution to a broader extent, and uses the power of Oracle’s Java Dynamic Connector to provide interoperability with JD Edwards EnterpriseOne™ and external systems.
After reading this guide, you should be able to submut a batch process on the server.
At design time, the PortX JDE Connector allows you to discover functions by name providing full access to all Business Function signatures. Given that discovery is a heavy duty process, the Connector manages a cache repository for all function’s metadata used at least once.
The results of a function call will be injected into the flow as a Map containing key-value pairs with the invocation’s output values. This approach gives the end user freedom of choice to construct complex flows and manage custom exception strategies.
Furthermore, you can have all functions in the flow, processing within the same transaction, and commit or rollback all changes.
Prerequisites
This document assumes that you are familiar with Oracle’s JD Edwards EnterpriseOne™ basics, Mule the Anypoint™ Studio interface.
Requirements
-
Review the PortX JDE Connector for Mule 4 – Getting Started Guide for a detailed list of requirements and setup prerequisites.
Demo Project - Submit a Batch Process
| It is recommended that you update AnyPoint Studio before starting with a PortX JDE Connector project. |
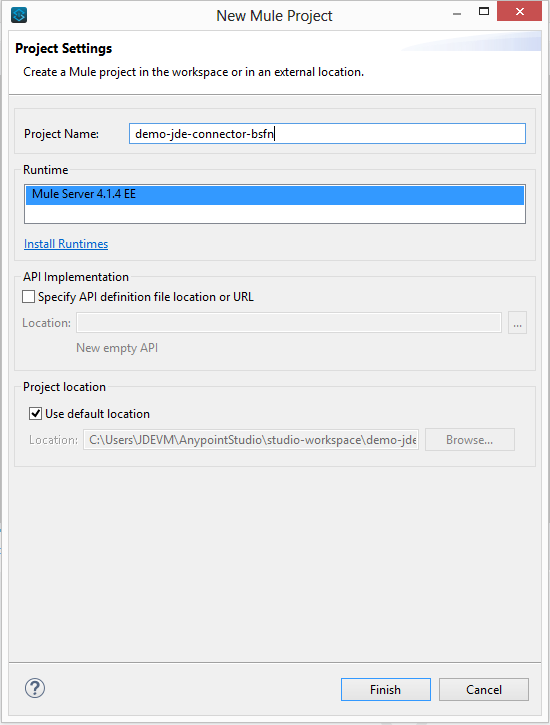
Creating a new Mule Project
Create a new Mule Project with Mule Server 4.1.1 EE or greater as runtime:
Project Dependencies
In you pom.xml, add the following to you repositories section :
<repository>
    <id>portx-repository-releases</id>
    <name>portx-repository-releases</name>
    <url>https://portx.jfrog.io/portx/portx-releases</url>
</repository>
Add the following to you dependencies section :
<dependency>
<groupId>com.modus</groupId>
    <artifactId>mule-jde-connector</artifactId>
    <version>2.0.0</version>
    <classifier>mule-plugin</classifier>
</dependency>
<dependency>
    <groupId>com.jdedwards</groupId>
    <artifactId>jde-lib-bundle</artifactId>
    <version>1.0.0</version>
    <classifier>mule-4</classifier>
</dependency>
Add or update the following to you plugins section :
<plugin>
    <groupId>org.mule.tools.maven</groupId>
    <artifactId>mule-maven-plugin</artifactId>
    <version>$\{mule.maven.plugin.version}</version>
    <extensions>true</extensions>
    <configuration>
        <sharedLibraries>
            <sharedLibrary>
                <groupId>com.jdedwards</groupId>
                <artifactId>jde-lib-bundle</artifactId>
            </sharedLibrary>
        </sharedLibraries>
    </configuration>
</plugin>
Required files
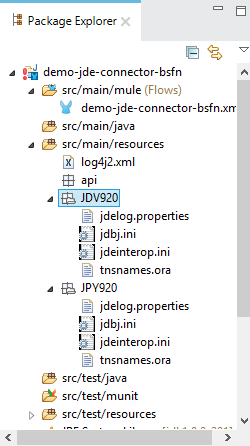
Copy the JD Edwards EntrpriseOne™ configuration files to the following folders within the project:
-
Project Root
-
src/main/resources
| If there is a requirement to use different configuration files per environment, you may create separate folders under src/main/resources corresponding to each environment as shown below. |
The mule-arifact.json file needs to be updated per environment as below
{
	"minMuleVersion": "4.1.4",
	"classLoaderModelLoaderDescriptor": {
		"id": "mule",
		"attributes": {
			"exportedResources": [
				"JDV920/jdeinterop.ini",
				"JDV920/jdbj.ini",
				"JDV920/tnsnames.ora",
				"JPY920/jdeinterop.ini",
				"JPY920/jdbj.ini",
				"JPY920/tnsnames.ora",
				"jdelog.properties",
				"log4j2.xml"
			],
			"exportedPackages": [
				"JDV920",
				"JPY920"
			],
			"includeTestDependencies": "true"
		}
	}
}
Other Considerations
To redirect the JD Edwards EntrpriseOne™ Logger to Mule Logger (allowing you to see the JDE activity in both Console and JDE files defined in the jdelog.properties, you may add the following Async Loggers to log4j2.xml file.
<!-- JDE Connector wire logging -->
<AsyncLogger name="org.mule.modules.jde.handle.MuleHandler" level="INFO" />
<AsyncLogger name="org.mule.modules.jde.JDEConnector" level="INFO" />
Troubleshooting
If you are having trouble resolving all dependencies,
-
Shut down AnyPoint Studio
-
Run the following command in the project root folder from the terminal/command prompt,
mvn clean install
-
Open AnyPoint Studio and check dependencies again.
Configure the Global Element
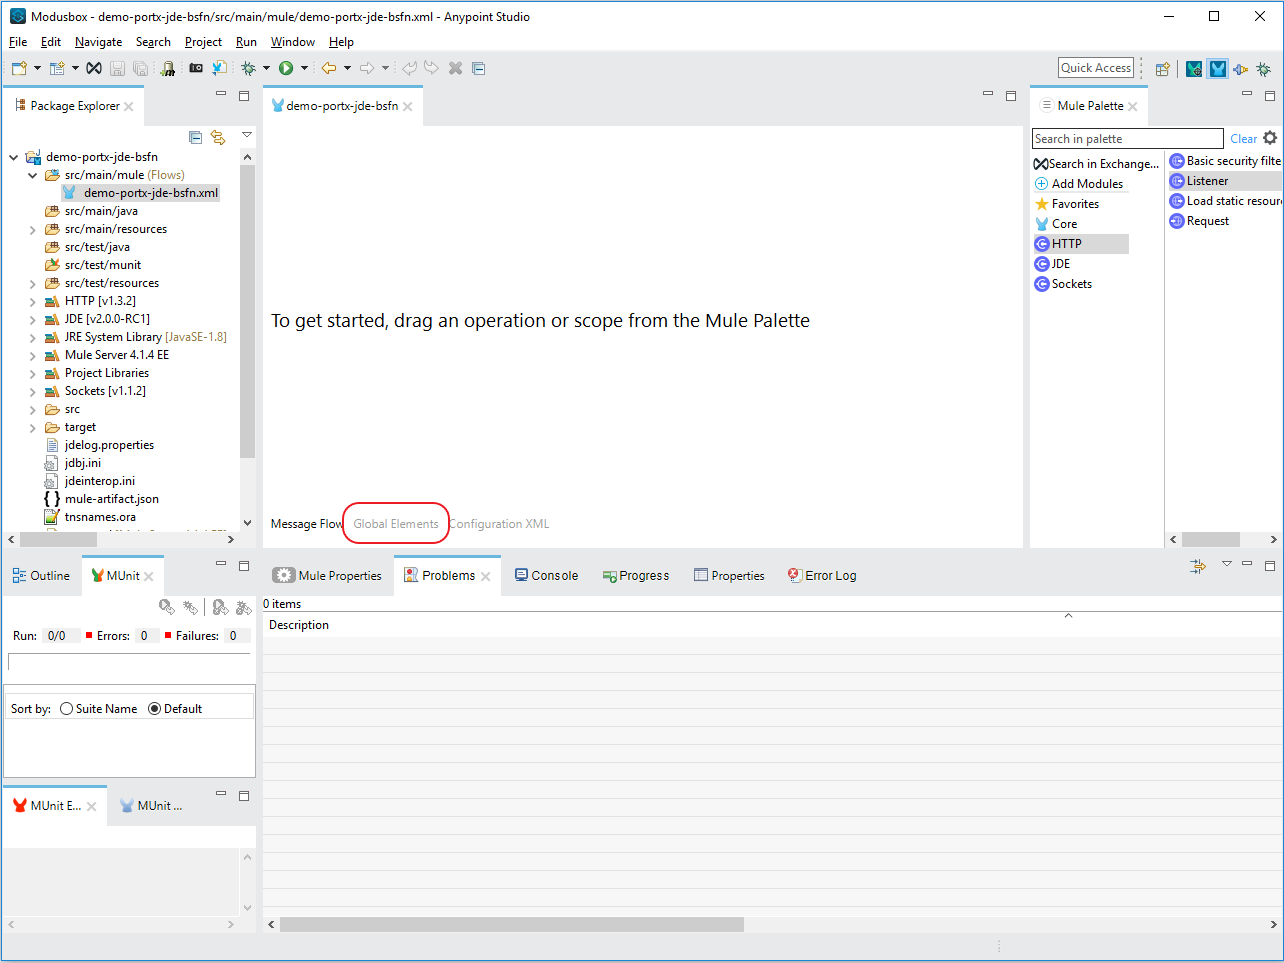
To use the PortX JDE Connector in your Mule application, you must configure a global element that can be used by the connector (read more about Global Elements).
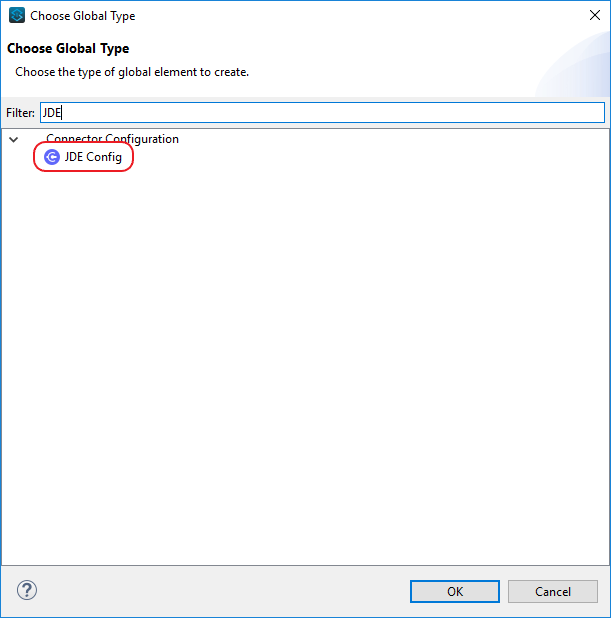
Open the Mule flow for the project, and select the Global Elements tab at the bottom of the Editor Window.
Click Create
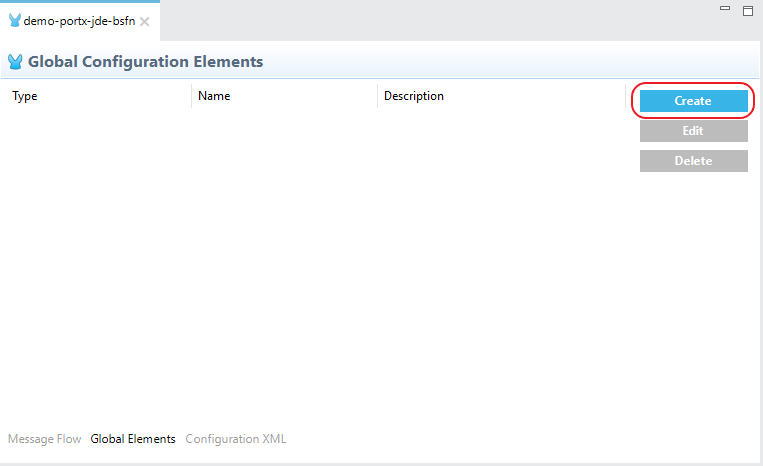
Type “JDE” in the filter edit box, and select “JDE Config”. Click OK
On the General tab, enter the required credential and environment

Click Test Connection. You should see the following message appear.
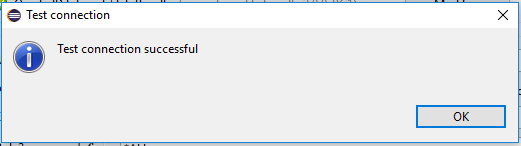
You are now ready to start using the PortX JDE Connector in your project
Creating a HTTP Listener for your flow
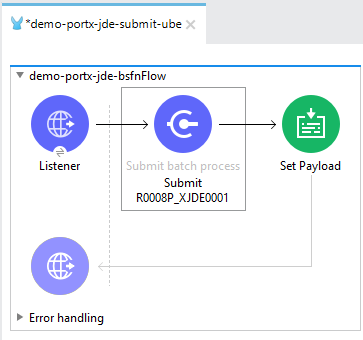
NOTE : This use case example will create a simple flow to submit a job for UBE R0008P_XJDE0001 on Oracle’s JDE EnterpriseOne Server.
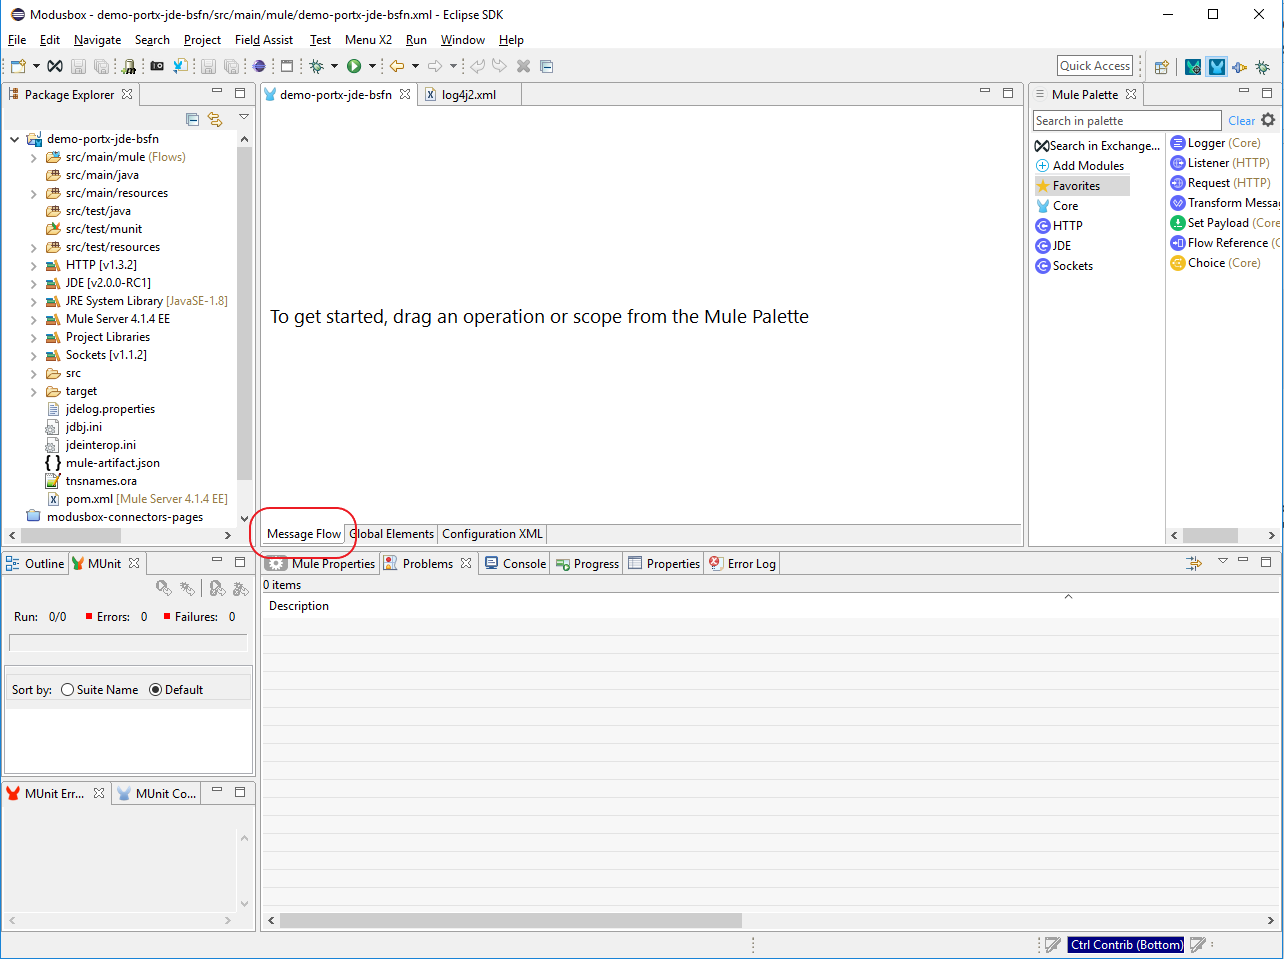
Go back to the Message Flow tab
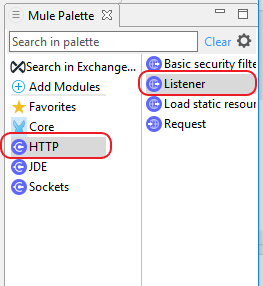
From the Mule Palette (typically top right), select HTTP, and drag Listener to the canvas
Select the HTTP Listener component from the canvas, and inspect the properties window
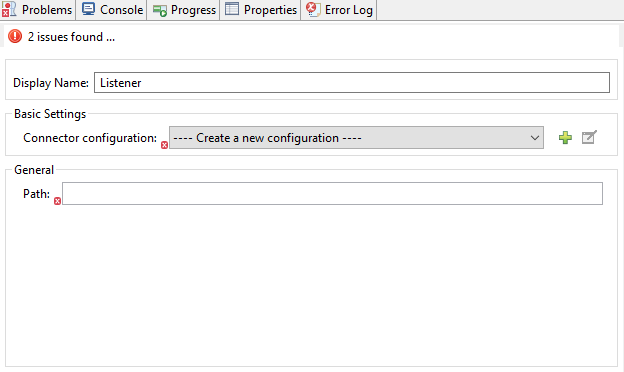
The connector requires a Connector Configuration. Click on Add to create a connector configuration.
Give the HTTP endpoint a more descriptive name like get-submitR0008P-http-endpoint and press OK to go back to the global HTTP endpoint dialog box:

Add a path to the URL eg. submitR0008P_XJDE0001.
Save the project. The connector will be ready to process requests.
Submit a Batch Process / Report
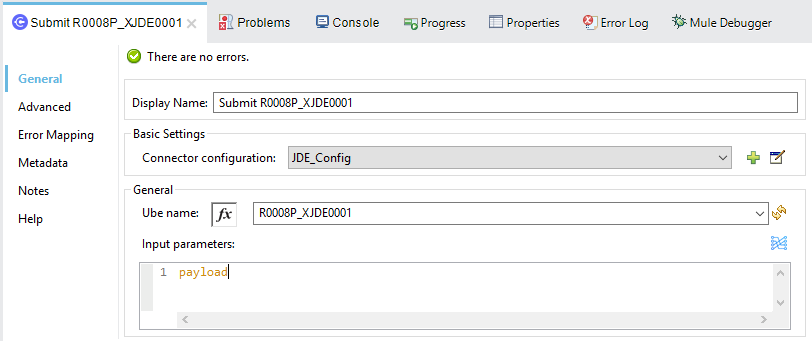
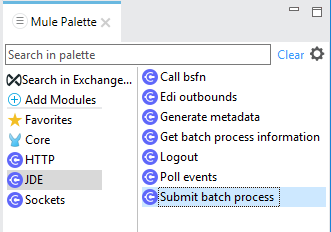
Locate the JDE Connector, and select Submit batch process. Drag this to the canvas.
Drag the connector over to the canvas. Select it and review the properties window. Give it a meaningful name eg. Submit R0008P_XJDE0001.
Under the General section, click on the drop-down for UBE Name, and type in the Batch Job and version you want to call in the BatchJob_Version format eg. R0008P_XJDE0001
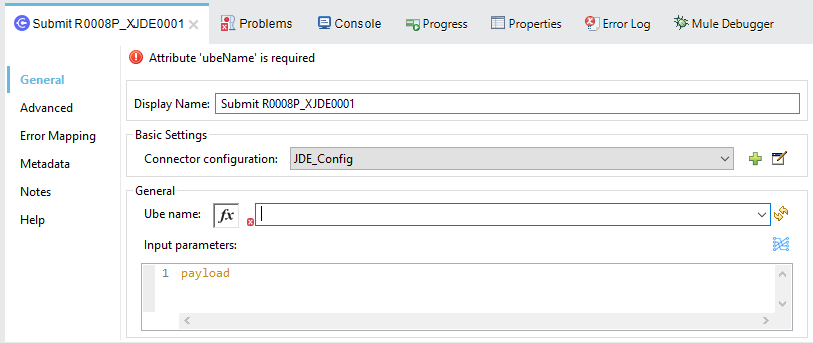
NOTE : If it is the first time you are selecting a UBE, this might take a while, as no information has been cached yet. Please be patient. The status bar (bottom right) will display the following while it is retrieving the metadata.
![]()
Troubleshooting
If the operation fails (possibly due to a timeout), you will see the below message
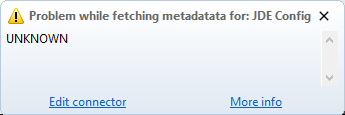
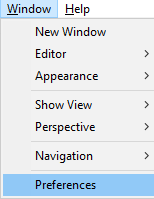
Please review the timeout settings in Anypoint Studio's Preferences.
To do this go the the Window > Preferences menu
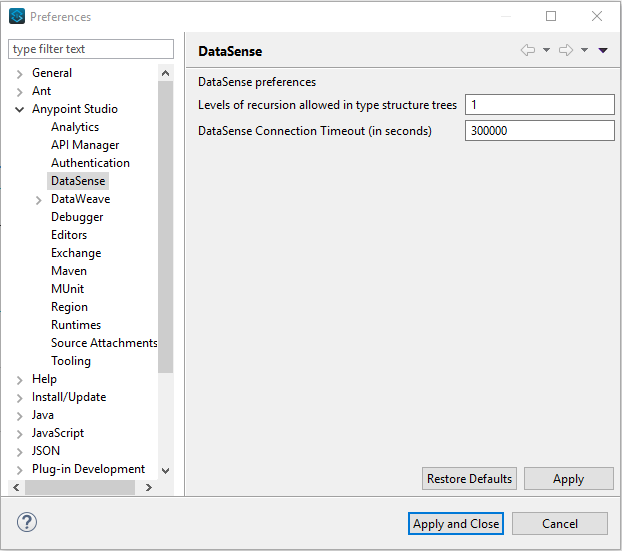
Go to Anypoint Studio > DataSense and change the DataSense Connection Timeout setting as below
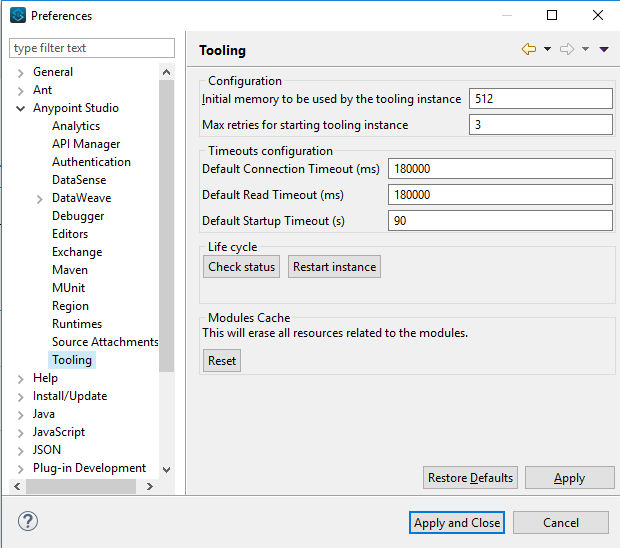
Go to Anypoint Studio > Tooling and change the Default Connection Timeout and Default Read Timeout settings as below
Setting Parameters
After the system has retrieved the required metadata, select R0008P_XJDE0001 from the list. The specification metadata will be retrieved from the enterprise server, and put into the project metadata repository.
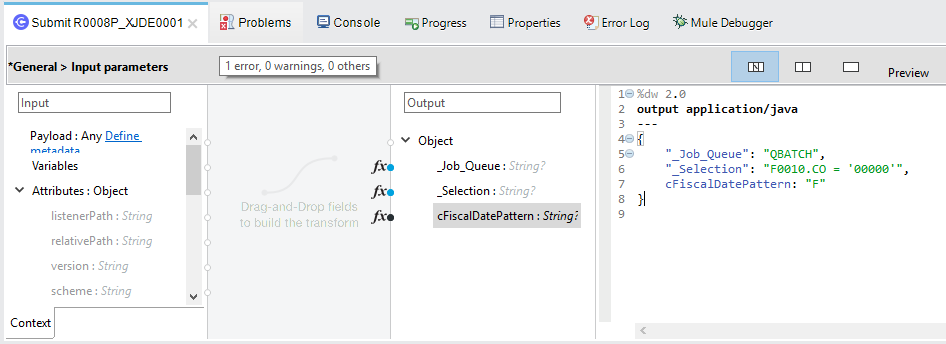
You may now assign the input parameters. You can do this by either entering the payload values manually, or via the “Show Graphical View” button.

Drag the inputs to outputs, or double-click the output parameter to add to your edit window, and change as required. Eg.
_Job Queue : [Enter the Job Queue or leave blank for the default job queue
_Selection : F0010.CO = ''00000'' (See Appendix A for data selection details)
cFiscalDatePattern : F
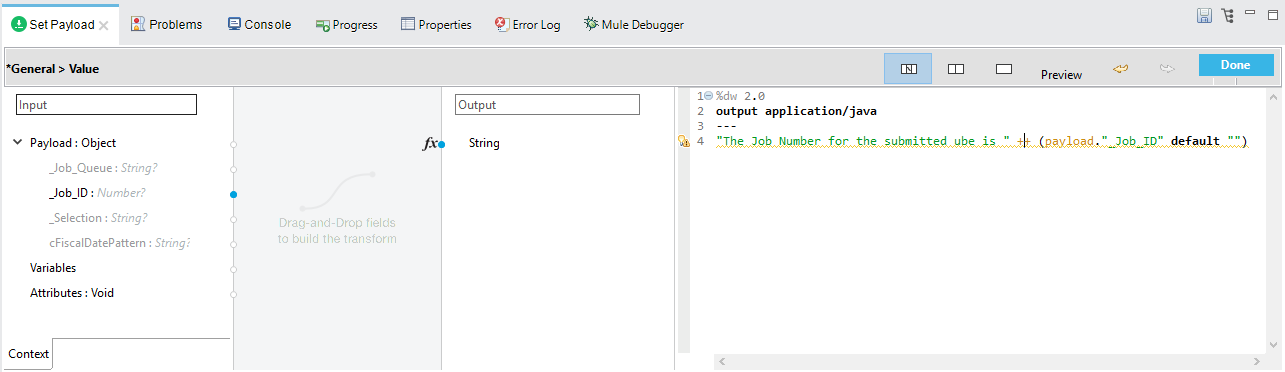
Set Payload Output
In the Mule Palette, you can either select Core, scroll down to Transformers or type “Payload” in the search bar.
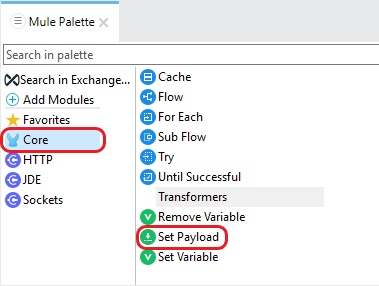
Drag and drop the Set Payload to your canvas.
Select the Set Payload component, and review the properties.
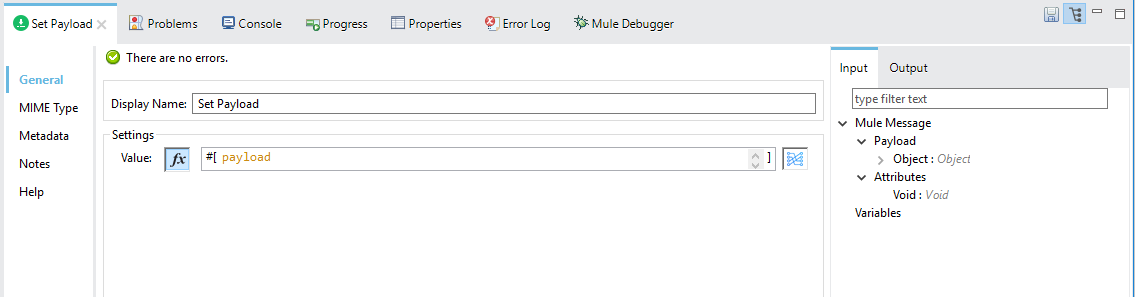
Change the payload to reflect the desired output, and save the project
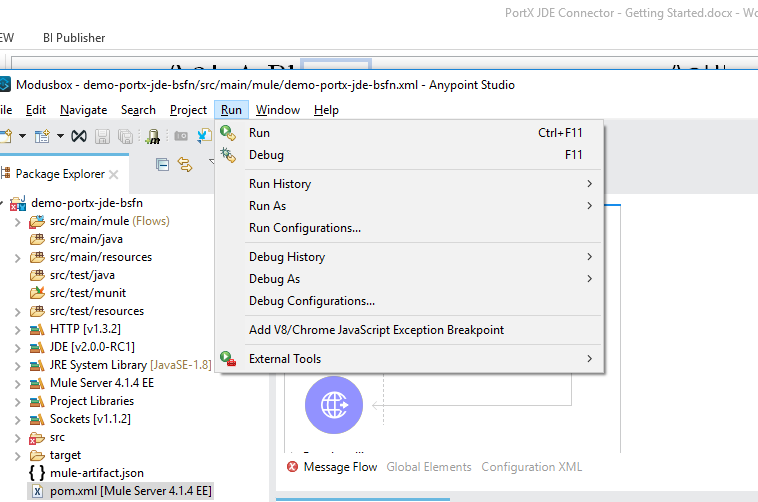
Testing the Mule Flow
To Test your flow, you need to start the Mule application. Go to the Run menu, and select Run.
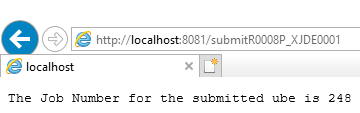
After the project has been deployed, you can test you flow by typing the URL into a web browser eg. http://localhost:8081/submitR0008P_XJDE0001
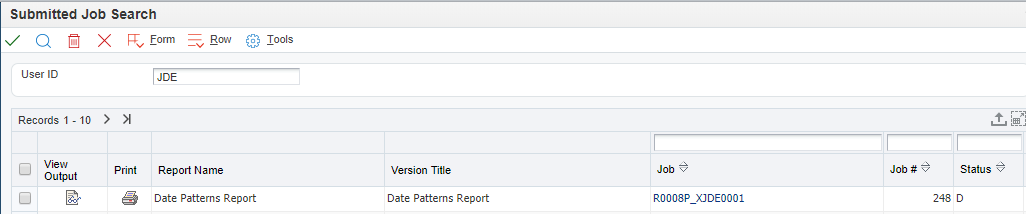
Log into JD Edwards EnterpriseOne and View Job Status for the user specified in the global element eg. JDE
Handling exceptions
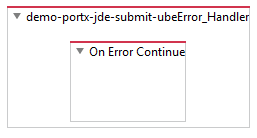
From your Mule Pallete, select and drag the Error Handler to your canvas

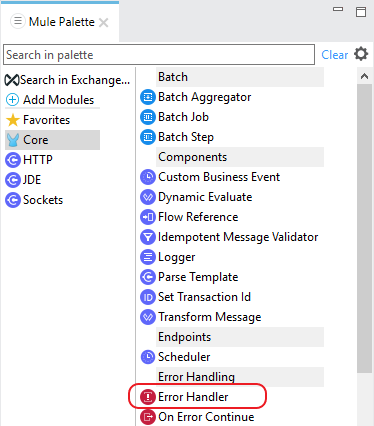
Now select and drag the On Error Continue into the Error Handler
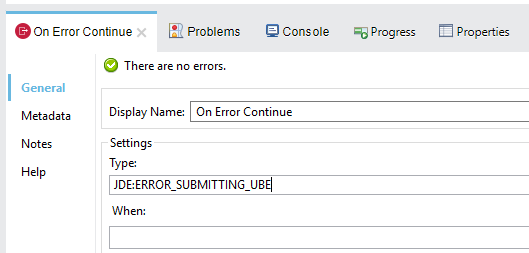
Select the On Error Continue scope, and under Type enter JDE:ERROR_SUBMITTING_UBE
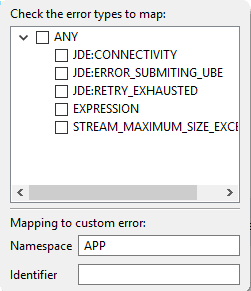
NOTE : The operation error types can be seen when selecting the operation on your canvas, going to Error Mapping, and clicking add. You may also map this error to a aplication specific error.
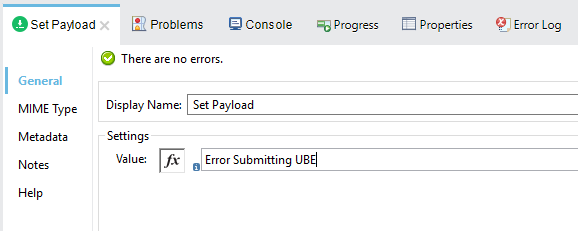
Drag the Set Payload component to the Error Handler, and set an appropriate message
Defining Data Selection
-
The parameter Selection is used to define UBE Data Selection.
-
The sentence is similar to a WHERE clause of an SQL statement.
-
The Selection syntax is:
-
table.column_name operator [value|table.column_name];
-
-
The table must be a JDE table that belongs to the main view of the UBE.
-
Column Name must be a JDE Data Item Alias.
-
The following operators can be used in the Selection :
| Operator | Description |
|---|---|
= |
Equal |
<> |
Not equal |
<> |
Not equal |
> |
Greater than |
< |
Less than |
>= |
Greater than or equal |
⇐ |
Less than or equal |
BETWEEN |
Between an inclusive range |
NOT BETWEEN |
Not Between an exclusive range |
IN |
To specify multiple possible values for a column |
NOT IN |
To exclude multiple possible values for a column |
-
The values can be literals or other table columns.
-
Literals can be String or Number
-
The sentence can include the AND and/or the OR conditions
-
To override the default precedence you need to use parenthesis as
-
C1 AND (C2 OR C3)
-
The sentence only accept one level of Parenthesis.
-
For example, this is a valid sentence because the maximum level of Parenthesis opened is 1.
C1 AND (C2 OR C3) AND (C4 OR C5)
otherwise, this is an invalid sentences because the maximum level of Parenthesis opened is 2.
C1 AND (C2 OR (C3 AND C4))
Examples:
F4211.KCOO = '00001' AND F4211.DOCO > 10332
F4211.KCOO = '00001' AND F4211.DOCO >= 10332
F4211.KCOO = '00001' AND F4211.DOCO <= 10332
F4211.KCOO = '00001' AND F4211.DOCO <> 10332
F4211.KCOO = '00001' AND ( F4211.DCTO = 'SO' OR F4211.DCTO = 'SI' )
F4211.KCOO = '00001' AND F4211.DCTO IN ('SO','SI')
F4211.KCOO = '00001' AND F4211.DCTO NOT IN ('SO','SI')
F4211.KCOO = '00001' AND F4211.DOCO BETWEEN 1022 AND 400
F4211.KCOO = '00001' AND F4211.DOCO NOT BETWEEN 1022 AND 400
F4211.MCU = F4211.EMCU AND F4211.DOCO NOT BETWEEN 1022 AND 400