Actor (Partner and Application) Configuration
Get Started
-
Start PortX. The Transaction Monitoring Page appears.
-
In the left-hand navigation pane, in the CONFIGURATION section, click Partners and Applications. The Partners and Applications Page appears.
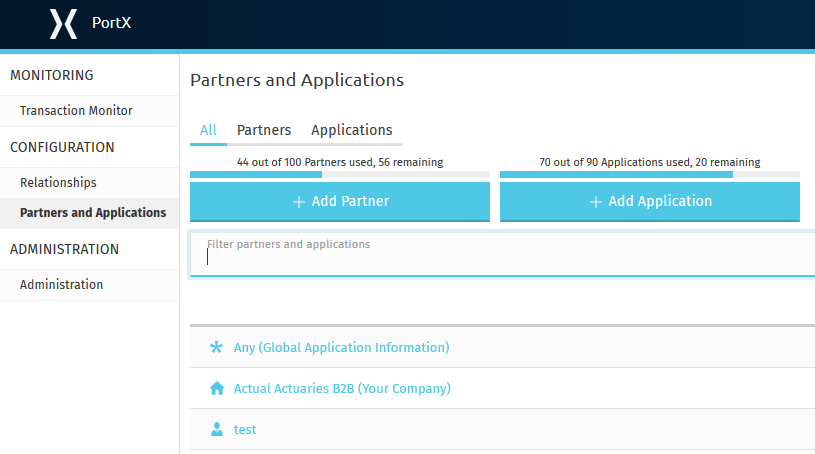
Add or Edit a Partner
-
On the Partners and Applications Page
To add a new partner, click Add Partner.
To edit information for an existing Partner click the name of the Partner in the Partners and Applications list.
To edit information for YourCompany B2B, click YourCompany B2B in the Partners and Applications list.
The Partner Information Page appears.
Add or Edit an Application
-
To add a new application, click Add Application.
To edit information for an existing Application, click the name of the Application in the Partners and Applications list. The Application Information Page appears.
-
To add or edit partner information, see Partner Information.
Notice that the left-hand navigation pane of the [img-partner-information] includes a number of different types of partner settings. To add or edit settings for any of these settings types, click the page name in the left-hand navigation pane. See the following sections for information about the settings on each page.
Saving Settings
On each page, a red bar appears on the lateral margins of boxes that correspond to required settings. When each required setting on a given page contains a valid value, the Save box at the top of the page is enabled.
To save new settings, click Save.
Exporting Partners
PortX provides the ability to export partners for:
-
Use in another environment
-
Backup purposes
These partners can be imported back into PortX later; see Importing Partners section for more information.
To Export a Partner
-
Start PortX. The Transaction Monitoring Page appears.
-
In the left-hand navigation pane, click Partner Configuration. The Partners and Applications Page appears.
-
On the Partners and Applications Page, in the Name table, select the radio button or radio buttons of the partner or partners you want to export.
On the Partners and Applications Page, the Promote and Export buttons appear to the left of the New Partner button. -
Click the Export button.
The Export Dialog Box appears; it lists the partners that will be exported. Click Export to export these partners. To abort the export, click Dismiss.
The export process begins.
When the process completes, it downloads a plain-text file that includes data for the selected partner or partners.
|
The downloaded file is automatically named. The file name pattern consists of the words partners_export, to which the current date is appended. For example, partners_export_2016-07-12.txt |
Importing Partners
PortX provides the ability to import Partners that have been exported (see Exporting Partners for more information). Only users with the appropriate role or permissions are able to import partners.
| If a specific partner exists in an environment and you import that partner into the environment, data from the imported partner replaces the data of the existing partner. |
To Import a Partner
-
On the Partners and Applications Page, click Import on the top right.
The Import partners box appears, displaying a list of environments into which you can import an environment.
-
To continue, select an environment from the Environment list, then click Next.
-
Click Choose File.
A file selection window appears. From the window, select the file that contains the data of the partner you want to import.
Select the Keep existing identifiers box if you want the partner you are importing to keeps its identifiers.
If this box is deselected, then identifiers for this partner that already exist in the environment you selected in the previous step will not be over-written.
Select the Override Certificates checkbox if you want the partner you are importing to keep its AS2 certificates.
If this checkbox is deselected, then certificates for this partner that exist in the environment you selected in the previous step will not be over-written. -
Click Import.
Promoting a Partner
PortX provides the ability to promote - that is, copy, a trading partner from one environment to another. For information about scenarios in which you might want to promote a partner, see Promotion Scenarios.
| Only users with the appropriate role or permissions will be able to promote partners. |
To Promote a Partner
-
On the Partners and Applications Page, click the selection box at the left end of the row that corresponds to the partner you want to promote.
-
Click Promote at the top right.
The Promote partners box opens, displaying the partner to be promoted.Select the Keep existing identifiers box if you want the partner you are promoting to keeps its identifiers.
If, on the other hand, this box is deselected, then identifiers for this partner that already exist in the environment you selected in the previous step will not be over-written.
Select the Override Certificates checkbox if you want the partner you are promoting to keep its AS2 certificates.
If this checkbox is deselected, then certificates for this partner that exist in the environment you selected in the previous step will not be over-written.To continue, click Next.
-
In the Promote partners box, select the environment to which you want to promote the partner, then click Promote. click Choose File.
A file selection window appears. From the window, select the file that contains the data of the partner you want to promote. -
Click Promote.